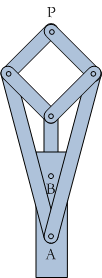
Peaucellier Linkage

This was the first linkage (or the second if you count the polyhedral linkage developed by Sarrus in 1853) capable of converting circular motion to linear motion. As the linkage swings back and forth, notice that the tip traces out a line.
Steps
- Cut out the pieces from card stock from the pattern. You can use an old manila folder if you don't have card stock. The short dotted lines at the top and bottom of the page can help you line up the cuts on a paper cutter.
- Punch the holes where marked.
- Use an X-Acto knife to cut along the lines of the flaps.
- Connect the two longest pieces to the rectangle at the point marked A in the diagram. To do this, lift up the two flaps perpendicular to the piece and curl the ends in so that the pieces with the holes can slip over them. Flatten the flaps again, thus holding the pieces in place.
- Turn the pieces you just connected over and attach the short piece marked B to the flap marked B on the underside of the rectangle. (We attach it to the bottom so the two long pieces won't get caught on the flaps at point B.) Turn the pieces back over again.
- Connect the rest of the pieces as marked.
- Operate the linkage by holding the rectangular piece flat onto the table (or taping it down).
- Swing the linkage up and down and notice that the point P travels in a straight line.
Notes
- James Watt, of the steam engine fame, created a linkage in 1784 that comes close to creating a straight line. However, it is only an approximation.
- Peaucellier discovered this in 1864.
- If you would like to strengthen the tabs, you can place a piece of packing tape over the part before you cut out the tabs and punch the holes.
References
Comments
comments powered by Disqus
